I mentioned in a post a while back that I would post some source code from my the CANReader application I wrote.
There are a few areas of the application that were most difficult so I think they are probably the best bits to share as the rest of the program is relatively simple.
CAN Frames:
In a vehicle running a CAN bus there are a number of nodes that send and receive data to one another. These nodes are usually things like the engine computer, instrument cluster, abs computer, body control computer etc... They are much like computers on a ethernet network sending packets of data to one another via TCP. The CAN bus uses a much simpler can 11 or 29 bit data format which Wikipedia describes in detail.
The RX8 electronics and all other cars I've tested with only use the earlier 11 bit format. This format consists of an 11 bit header, a 1 bit RTR flag to identify if the message is a data request and a further 4 bits to describe the length of the message data (which can be up to 8 bytes long).
The OBDLink device that I use (which uses an ELM 327 chipset from ELM electronics) does a lot of work for me. It parses the headers for can frames and returns as an integer (i.e. base 10 not hex) along with the data bytes in hex seperated by spaces.
For example a frame might look like this: 201 1F 00 0F 00 FF EF A1 7F. 201 obviously being the header identifier and the following 8 bytes the data. Headers need to be turned on to get '201' at the beginning of the data line (use ATH1 for headers on, ATCAF0 to turn off CAN auto formatting and ATMA to get the CAN frames).
I've written a CANFrame VB.Net class that can take this data as a string and parse it into something a little more friendly. This class has two main methods NewELMCANFrame() which will take data from an ELM device and another methods NewRawCANFrame() which will take a raw CAN frame string (including the header) with each byte seperated by a string. This second method is not fully tested as I dont have anything to really test it with, but it should work with lower level devices that return full CAN frames (you might need to make it handle strings without spaces though depending on your application).
USB Serial Ports:
While developing this application I came across a nasty .Net framework bug. It seems that if you have a class uses the SerialPort class connected to a virtual com port (i.e. usb serial port) and the device connected to that port is disconnected the next time you try to read from the SerialPort it will obviously fail. This is easy to trap in a Try/Catch. However when you try to Dispose() the object and possibly open a new connection to the port the .Net framework will raise an exception that cannot be trapped by user code :-(
This is because the closing underlying stream is not handled property. This is a know issue but Microsoft seems unwilling to fix it. There is a couple of work arounds though, albeit an ugly ones. Firstly placing the following code in your app.config will fix the problem but may cause issues for you elsewhere if you have unhandled exceptions...
<runtime>
<legacyUnhandledExceptionPolicy enabled="1"/>
</runtime>
I've also got a wrapper class for the SerialPort named FTDISerialPort that stops the Garbage Collector to calling Finalize() on the BaseStream of the SerialPort (which is what causes the exception after the usb device is disconnected).
Dynamic Scripting Code:
One of the most useful things with the CANReader application I wrote is to in real time run a algorithm over the bits in a CAN frames data. With this I can take bit X to bit Y, cast this to a number of numerical types and then perform some math on top of that to get a required value. For instance, if byte 1 to byte 2 is the engine rpm multiplied by 4 I can take bit 0 to bit 15, convert that to an Unsigned Integer and then divide that by 4 to get the engine rpm. This can all be done while the application is running without the need to recompile.
To get the bits for all of the bytes in a CANFrame class you must iterate the DateBytes() array and use the line Dim binaryValue As String = Convert.ToString(currentFrame.DataBytes(I), 2) to convert a byte to a binary number.
I've created a separate class based on code in my CANReader application and called it ParseBits, this has a shared method called ParseBits() that you can call with all of the pertinent information to run an algorithm (in VB.Net code) on your binary number. Quite useful if you need to pull flags and other such things out of bytes.
I hope this code is useful to you guys it certainly has been to me, if it is then let me know about it!
Showing posts with label can. Show all posts
Showing posts with label can. Show all posts
Thursday, March 4, 2010
Monday, March 1, 2010
TDD, NUnit, Rhino Mocks, CAN, ISO and more...
It's been a while since my last post, I would like to post with more frequency but I dont really have much to show from the last few weeks. I've written a lot more code for the digital gauge cluster which i've aptly named 'Digital Gauge', yes very exciting :-) There just isn't too much to show thats all.
Menus
I've developed a flexible fully functional multi-tier menu system that can be displayed in variety of ways depending on the displayed gauge theme (currently only a S2000 style display). This allows me to change between gauge styles, color schemes, data providers (e.g. a debugging provider returning random values for things or my OBDLink data provider for real data). I can also change a variety of settings for the application and gauges in general (e.g. redline, speed alert, audible warnings etc...) I've included some pictures of the menu in action for the S2000 style cluster below.


Indicator Lamps
You might also notice the hazard lights, I've now got a fully functional set of indicator lamps for things like the indicators/hazard lights, ABS, TCS, Engine Check, Battery etc... These can only really be powered by CAN data and not OBD data as most of these things are not accessible via OBD requests (Except for the engine check).
Unit Testing
I had been debating in my mind as to the importance and need of unit testing for a project developed by a single programmer. For small applications it isn't really needed but my application is growing at an alarming rate. At last count (two weeks ago) I had 100 individual class files each performing separate logic. With that much code there is bound to be bugs and things I've missed... So after a few discussions with some colleges at work I decided that it's worth the effort and would probably save me time in the long run by writing tests for all of my code.
Unit testing can be difficult when things are not developed to be easily testable, using techniques such as TDD / Test Driven Development greatly simplify things. However the idea with TDD is to write the test BEFORE you write your code! So quite a bit of code missed the boat. I've also been using the MVP / Model View Presenter design pattern which lends itself well to being easily tested. The idea here is that the display, processing and data storage responsibilities are separated into their own classes. This for one makes it very easy to have multiple cluster styles as all that is required is a new view (which is based on an interface anyways).
So for new code I will use TDD where possible and for testing the existing code I've been using a combination of NUinit and Rhino Mocks. Both free testing frameworks that work in very different ways. NUinit allows is a framework that allows the creation of standardised classes for testing, because it is so widely used there are lots of free tools that allow you to execute tests from directly in the visual studio IDE. Tests can also be run from continuous integration servers (a server that constantly compiles a projects code based and executes the tests on that code when changes are detected). With NUinit tests you basically write a method that checks and compares values against expected values. Rather simple but when used correctly very effective.
Rhino Mocks on the other hand is a framework that allows classes to be mocked and stubbed. Instead of having to write stubbed implementations of class dependencies you can actually stub individual methods on mocks of those classes. So for instance if you want a method on a class dependency to return a certain value maybe from a database without having to hit the database you can simple stub that method and test the code your specifically targeting.
Sounds like a lot of work? Well it is and it isn't. It's very time consuming but it's much easier to write a test for a specific scenario than it is to find an issue on a production system with a very limited user input system (e.g. a digital instrument cluster with four buttons to drive an entire OS). So the three to four weeks of writing tests spent now should mean less head aches down the road!
Other Stuff (CAN Standards and Chassis Arrival)
I've been in contact with a few sources over the last month who have provided me with some valuable details on how CAN systems are meant to talk to each other and identifiers of standard CAN components. Once I've collated all of these details into a neat package I will make another post in regards to this as it really warrants it's own post.
My shipping agent has contacted me and my Westfield SEiw chassis has arrived at the docks. I'm still going through the customs process so it will probably be later this week when I receive the chassis. There will definitely be some photos up here when I do!
I've also had some interest in me posting some source code for the program I wrote to reverse engineer CAN messages (original post). I will make another post over the next few days with some of the code used for this program.
Wednesday, February 3, 2010
Digital Instrument Cluster Development
Since my last post I've been spending most of my spare time developing the software for my digital instrument cluster. I started this over the christmas break by mocking up a Honda S2000 style cluster. This required quite a bit of math that even if I paid attention in trigonometry in school I probably still never would have remembered. But after some pain and headaches I was able to get something that looked somewhat like a Honda S2000 cluster.
Over the last few weeks I have extended this basic screen into a fully working application using the model/view/presenter development design pattern which for what I am doing makes adding new cluster designs, data providers and logic very simple. Think of is a a plug and play system with lots of small components that can easily be interchanged without rewritting software.
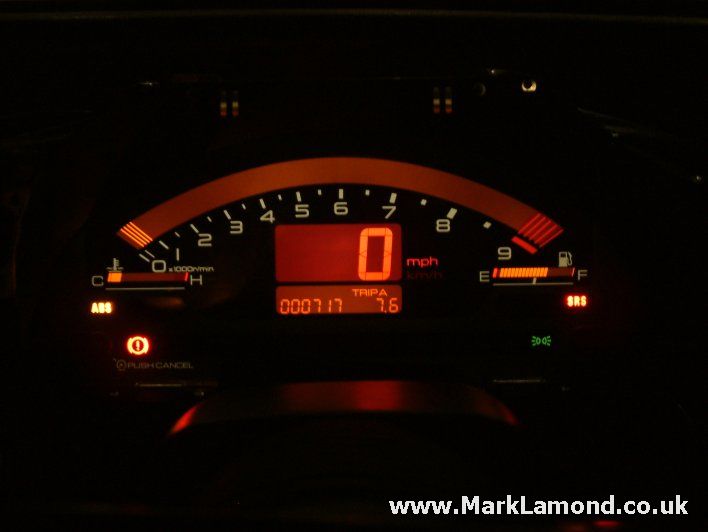
I've added three color schemes to the S2000 cluster based on some color designs that Qube Engineering actually make for the real Honda cluster. Here are some samples of the computer based cluster images and below them their originals.


Because I dont have a working Mazda CAN bus system (still collecting parts for the RX8 to get the system working, they should arrive by Friday I hope) I have been using my fiance's Toyota Echo for testing using generic OBD-II (on board diagnostics) port to obtain the data needed for display on a cluster. The problem with this is that I have to query the car for this data and I can only get between 4-6 responses from the car per second so data isn't displayed all that fast. On a CAN bus system I can get hundreds of packets of data in a second so data display will be in real time (the cluster on CAN equiped vehicles uses the exact same data) and in essence be getting the data from the source. The other benefit of the CAN bus is that I am able to obtain information that simply isn't available via diagnostic commands such as when the indicators are on, handbrake is up, brakes are active and quite a lot more.
I've recorded and uploaded two live test runs videos. The first one is a very short test run showing a few more revs, while the second one is recorded in peak hour traffic leaving the city.
Both of the recordings show the following data:
Down the track once I have a working dash running from CAN data I will add some more gadgets such as GPS navigation (basic and driven from google maps like xGPS) combined with an accelerometer (probably from a Wiimote normaly used for a Nintendo Wii) and digital compass. With these combined I should be able to make a halfway decent navigation system that knows which way my car is facing at a standstill. This will also double as a data logger and lap timer for when I race on the track.
So I will know gear, speed, revs, g-forces etc for every single point I am on the race track. A display like what you can get on popular racing games like Gran Turismo shouldn't be to hard to acheive either!
I do have a few other things in the works for the cluster such as a better design based on a Lexus but I will save that for another post once I have made the software more reliable and robust. Until then....
Over the last few weeks I have extended this basic screen into a fully working application using the model/view/presenter development design pattern which for what I am doing makes adding new cluster designs, data providers and logic very simple. Think of is a a plug and play system with lots of small components that can easily be interchanged without rewritting software.
I've added three color schemes to the S2000 cluster based on some color designs that Qube Engineering actually make for the real Honda cluster. Here are some samples of the computer based cluster images and below them their originals.


Because I dont have a working Mazda CAN bus system (still collecting parts for the RX8 to get the system working, they should arrive by Friday I hope) I have been using my fiance's Toyota Echo for testing using generic OBD-II (on board diagnostics) port to obtain the data needed for display on a cluster. The problem with this is that I have to query the car for this data and I can only get between 4-6 responses from the car per second so data isn't displayed all that fast. On a CAN bus system I can get hundreds of packets of data in a second so data display will be in real time (the cluster on CAN equiped vehicles uses the exact same data) and in essence be getting the data from the source. The other benefit of the CAN bus is that I am able to obtain information that simply isn't available via diagnostic commands such as when the indicators are on, handbrake is up, brakes are active and quite a lot more.
I've recorded and uploaded two live test runs videos. The first one is a very short test run showing a few more revs, while the second one is recorded in peak hour traffic leaving the city.
Both of the recordings show the following data:
- Vehicle Speed
- Engine RPM
- Coolant Temperature Gauge
- Intake Air Temperature (Top left hand side of the info box)
- Current time
- Coolant Temperature (Top right of the info box prefixed by 'w')
- Odometer (Bottom left of the info box)
- Selected Gear (Calculated based on known gear ratios, engine rpm and vehicle speed)
- Trip Meter A (Bottom right of info box)
Down the track once I have a working dash running from CAN data I will add some more gadgets such as GPS navigation (basic and driven from google maps like xGPS) combined with an accelerometer (probably from a Wiimote normaly used for a Nintendo Wii) and digital compass. With these combined I should be able to make a halfway decent navigation system that knows which way my car is facing at a standstill. This will also double as a data logger and lap timer for when I race on the track.
So I will know gear, speed, revs, g-forces etc for every single point I am on the race track. A display like what you can get on popular racing games like Gran Turismo shouldn't be to hard to acheive either!
I do have a few other things in the works for the cluster such as a better design based on a Lexus but I will save that for another post once I have made the software more reliable and robust. Until then....
Thursday, December 3, 2009
S15 Sold, Engine Delivered
Well after about five weeks and very few actual shoppers and plenty of time wasters I've finally sold my S15. And not a moment too soon, next week I need to make final payment on my clubman so everything is running smooth at the moment.
I also had the RX8 engine and parts delivered yesterday. This on the other hand was not the smoothest of deliveries. Firstly they tried to deliver it on Tuesday without calling me first so that I could arrange to be home to unpackage the 320kg box off the truck. So I arranged for redelivery the following day between 9-12am. It didn't arrive... So after about 5 phone calls to TNT the package arrived at 5:05pm. A wonderful day of daytime TV it was...
I've also been looking into how I am going to tackle the task of wiring everything up. I have the majority of the electrical components from the donor RX8 and I learned recently thanks to a blog named Madox.NET the some Mazda's (RX8 included) run a CAN network that allows all of the electronics in the car to talk to each other much like computers do on a normal network.
With some specialist devices such as OBDLink a normal computer can also talk on this network through the cars diagnostic port. This port will allow me to do two things, firstly I will be able to check error codes from the engine ECU which will help me to pass emissions and trouble shoot setup issues. Secondly I will be able to intercept signals that would normally go to the dash for things like engine revs, speed, trip computer etc
What I am proposing to do is instead of using a dash from a car or motor bike is to instead use an Asus EEE PC T91 tablet PC with the CAN hardware and some software I will develop myself to create my own dash. Because I will be getting data directly from the Mazda sensors, some of which isn't normally displayed to the driver I will be able to show all ADR required gauges and more. What's great about this is it will be far cheaper and easier than buying seperate gauges and having to install new sensors for them. Plus, if I can have a whole range of dash designs and flick through them with a touch of the screen and adding warning lights/buzzers will be a matter of a few lines of code rather than a heap of wiring/cutting etc...
 Here is a sample screen shot of a RX8 style dash design written in .Net using Dundas Gauges, I also added a basic three stage shift light that lights up yellow, then organge then completely red when it's time to shift.
Subscribe to:
Posts (Atom)